If this Pan Could Talk
Hello my Foodie Friends!
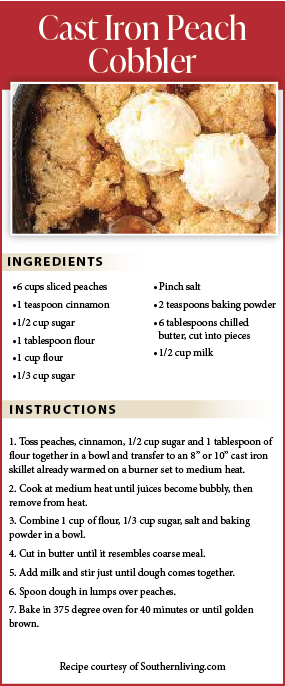
Summertime is wonderful. Along with beautiful weather are moments of making memories through family gatherings and celebrations. Summertime is always filled with food and fun. What is it about peach cobbler and summertime that we love so much? Think about it, whenever you think of delicious peach cobbler, you almost always think of warm summer nights, camping trips, and backyard barbecues. It’s as if this amazing dish has become the unofficial dessert of summertime fun!
So how do you take such a well-known, traditional dish, and make it better? How do you improve on something that is so amazing already? Easy, you simplify the ingredients, making it easy to make, then you throw it all in a cast iron skillet and bake it right up. The peach cobbler dessert was among the many items my grandmother used her cast iron pans for. Whenever we visited my grandmother, her home smelled of meatballs, sausage and sauce cooking, with the gentle aroma of peach cobbler drifting into the hall. Shortly after we arrived, my grandmother would ask for assistance to take the cast iron pan of meatballs and sausage from the stove. Then she would pull the black frying pan from the oven. Quickly she would position the skillet on the table to cool with strict directions that we were not to “taste” it before it was officially served. We would all wait anxiously around the big dining room table. Each of us grandkids would secretly hope that we could get the cobbler before the meatballs. However, my grandmother was strict that we ate our main meal before any dessert. Being from an Italian family, meatballs and sausage were always part of the summertime picnic food. As we would help her bring out her culinary delights to our summertime festivities, everyone would sit waiting for her food – because it was always so amazing. My grandmother was a practical person. She believed kitchen utensils should have more than one use. If you could use your cast iron skillet for frying, why not use it for baking? My grandmother passed on the tradition of baking in a cast iron frying pan to my mother and in time to all of my brothers, sisters and to me.
I am not alone in my story of cast iron. These pans are extremely versatile and can last a lifetime. Everything from frying eggs, cooking a stew and baking a pie can be done in a cast iron pan. With a little care, these pans can become a hand-me-down family heirloom. Owning one can open up a whole new world of cooking, and the flavor that a cast iron pan can add to food is amazing.
In order to be successful when using cast iron, you have to know how to care for it, basically what to do and what not to do to your pans. If you treat them right, they will be so easy to cook with and will quickly become your go-to pan. First, season your pan. Seasoning is basically oiling the pan to give it a nonstick surface and prevent rusting. Even though most pans are sold “pre-seasoned,” you’ll still want to season it before its first use. Give your new pan a good rinse with plain old water and then heat it on the stove over medium heat. Once the pan is warm, add a small amount of oil. Using a cloth, work the oil all around the inside bottom and sides of the pan. Give it a good coat, about a teaspoon for a 10-12 inch skillet, but not so much that there is standing oil in the pan. Then let it cool to room temp. You’ll want to repeat this process a few more times until the surface is glossy, but not sticky, and, if needed, scrub lightly. A properly seasoned pan is naturally nonstick, however if there is stuff stuck to the pan, you can scrape it and scrub with a hard bristle brush. After washing or scrubbing, if necessary, make sure to fully towel dry your pan to prevent rusting.
Our favorite and bestselling cast iron is Lodge. Lodge is seasoned cast iron cookware, so they begin the seasoning process for you. Lodge provides pre-seasoned cookware with no synthetic chemicals; just soy-based vegetable oil. The more you use your cast iron, the better the seasoning becomes. Lodge is MADE IN THE USA and has been making cast iron cookware in South Pittsburg, Tennessee since 1896. With over 120 years of experience, their cast iron is known for its high-quality design, lifetime durability, and cooking versatility and is FAMILY-OWNED.
I wish I had my grandmother’s original cast iron. Oh, if those pans could talk, the stories they would tell. Stop by Compliments to the Chef, your Neighborhood Kitchen and Cutlery store, located at 33 Railroad Place in Saratoga Springs, for the hard to find, cool culinary tools. Remember my Foodie Friends, “Life Happens in the Kitchen.” Celebrate, reflect, and listen to the stories from generations before us. Savor the memories and bring back some of the recipes that those before you cooked.
Take Care, John & Paula